Building Custom VSTS Build Tasks
The new VSTS (Visual Studio Team Services – formerly Visual Studio Online) task based build system is absolutely fantastic (also in TFS 2015 on premise). I’ve been slowly and surely falling in love with it in the realization that is is so simple to use and once you know how to build a custom task for it, you can do anything very quickly. I’ve had some very choice words for the old XAML based build workflows and found myself days deep in updates and completely lost. This is a real breath of fresh air, and in my opinion has refreshed one of the strongest pain points in TFS.
As mentioned, you can very easily and quickly create and deploy custom build tasks to your system to do just about anything you can script out, and if you want to truly customize or harness your build / automation pipeline this is going to be a necessity.
Anatomy of a Build Task

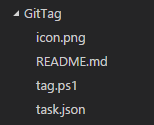
The simplest of tasks (and most are simple), is build utilizing a single folder representing the name of the task you want to build. In this example, I have a custom task built to add a GIT tag to GitHub.com during the build.
- icon.png – this is the image that should appear next to the build tasks. It could represent the technology or the author. I generally tend to put the logo of our company as we build custom tasks to identify to our people which tasks are ours and which ones are not custom.
- README.md – this is not required. But if you upload your tasks to GitHub a nice quick rundown in markdown of the task and its parameters goes a long way.
- tag.ps1 – this is a powershell script (uhmmm, obviously). This name is not special and could be named whatever I like. I can have as many other scripts or tools needed to perform my task in this folder as well.
- task.json – this is the only required file and most important. This json files describes the UI input and and all required meta data needed to take in the customizable portions of the powershell script you will write.
The Task JSON Definition
-
{
-
"id": "4b4d6ab0-1c7d-44c6-8d5b-5d938bb65869",
-
"name": "ProgrammaticNameOfTask",
-
"friendlyName": "Friendly Name of Task With Spacing",
-
"description": "Description of the task in the list area.",
-
"category": "Deploy",
-
"visibility": [ "Build" ],
-
"author": "Your Name or Company",
-
"version": { "Major": 1, "Minor": 0, "Patch": 1 },
-
"groups": [
-
{
-
"name": "advanced",
-
"displayName": "Advanced",
-
"isExpanded": false
-
}
-
],
-
"inputs": [
-
{
-
"name": "InputOne",
-
"type": "string",
-
"label": "Input 1",
-
"defaultValue": "",
-
"required": true,
-
"helpMarkDown": "What the user can see when they hover over the ‘i’ icon for help."
-
},
-
{
-
"name": "InputTwo",
-
"type": "string",
-
"label": "Input 2",
-
"defaultValue": "",
-
"required": true,
-
"helpMarkDown": "What the user can see when they hover over the ‘i’ icon for help."
-
}
-
],
-
"instanceNameFormat": "Subtitle Name for Instance",
-
"execution": {
-
"PowerShell": {
-
"target": "$(currentDirectory)\\PowershellScript.ps1",
-
"argumentFormat": "",
-
"workingDirectory": "$currentDirectory"
-
}
-
}
-
}
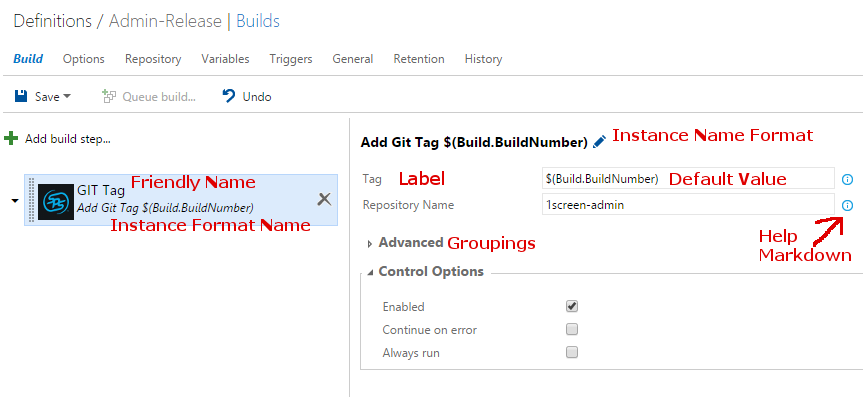
Here is a general idea of where these values will show up on the UI:
- id – This must be a unique GUID to represent the task. Just generate a new one and slap it in. Then never change it for this task. If you decide to copy someone else’s tasks from GitHub you may want to modify this ID and re-upload as your own. If you do so I have found that sometimes you must also change the “name” field for it to be recognized as unique.
- name – this is the referenced programmatic name.
- friendlyName – the name that is displayed everywhere to the end user.
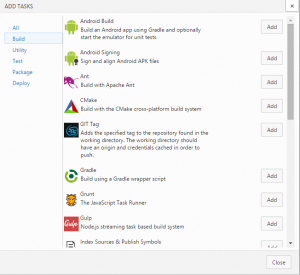
- description – the description is shown in the list with other tasks when you are adding / selecting a new task.
- category – the left hand category in task selection that this task should appear under. Some of the categories by default include: “Build”, “Utility”, “Test”, “Package”, “Deploy”. I have not tried adding a custom / new category yet, but would assume it simply adds it to the left category selection when you do (if anyone has tried this please leave a comment).
- visibility – I believe this field allows you to apply a custom task so it only appears for “Builds” or for “Release Management for example. Though in my testing setting it as “Build” it still shows up in RM and visa versa.
- author – the author, you, or your company name.
- version – must be unique every time you upload.
- groups – allows you to create custom groups for bucket your UI inputs into. This is nice to hide advanced functionality for example. You can set if that group should be expanded by default on open or not.
- inputs – allow you to specify as much input as you need to configure your task.
- instanceNameFormat – appears in the list of your other configured tasks to help differentiate between multiple instances of the same task type.
- execution – determines how and what this custom task will do when it is asked to run. I’m still a little vague on how to do anything else than get a powershell script to run here. But that scenario has worked for most everything I have needed to do. In here you can specify the working directory and the local powershell script that should execute. By default the target script will run passing in all the inputs as params into the script.
The PowerShell Script
The script by default will receive all the inputs you have specified in your inputs section of the task.json. So our powershell script for the above could look like this:
-
param ([string]$InputOne, [string]$InputTwo)
-
-
# Do some automation work!
-
Write-Host "Doing some work!"
Depending on what you need to do inside your script, you may find yourself iterating directories recursively in the source code to reversion before building, in which case you can pass in or at least default some of your inputs to Build Variables. Such as “$(Build.SourceDirectory)” or “$(Build.BuildNumber)”.
Also Note – anything you write in your script out to the host, will show up in the output window when you run the build.
Check out all the build variables here that you likely will need: https://msdn.microsoft.com/en-us/library/vs/alm/build/scripts/variables
Deployment
Of course you’ll want to test your powershell script locally by manually executing it with appropriate parameters against a simulated file system source. That is pretty easy to do. But there is no easy way to validate your json meta data other than a bit of trial and error. I’ve found after a couple of tries it is pretty easy anyhow. This is the most straightforward guide I have found to get your build tasks uploaded using the “tfx” utility:
https://github.com/TotalALM/VSTS-Tasks
Keep in mind after each time you upload a task, you’ll need to increment the version patch number (or other) so it is allowed.
Resources
While putting together a custom task is simple, if its already built that is even better. All of the built in default tasks Microsoft as added you can find open source here:
https://github.com/Microsoft/vso-agent-tasks
These are great bases and examples to review to see how to build what you are looking for, or even take them as starting points to extend.
You can also find some additional helpful tasks here:
https://github.com/TotalALM/VSTS-Tasks
And there are some cordova tasks:
https://github.com/Microsoft/vsts-cordova-tasks
Strategy and Thoughts
It is create to utilize some pre-built tasks already. However, if your utilizing these tasks in a larger organization you may want to cut out some of the repetitive noise in utilizing the same task over and over again. Perhaps your company has standards and defaults for certain fields in the tasks. In this case you should consider moving these fields into an “un-expanded” group and defaulting them. The beauty in this is that your organization can use these tasks and you can modify the defaults and upgrade the task for all builds at one time if you have a change to the task itself.
This is exactly what we have done at our company, and you may even find some hard coded credentials in a couple of spots. While not ideal, this really prevents us from doing some boilerplate work for build variables every time we set up a new build. This is why I currently cannot point you to a public repo with the tasks we have been working on. However, if you think any of the below items are useful for you I’d be happy to post a more generic version of it:
- DacPac Deploy – deploys a dacpac using a bunch of preset standards and command switches for our company. It also performs the deploy remotely from the agent.
- DacPac Deploy Report – Creates and send an email to an individual of a SSDT dacpac command report, noting all the changes. This can be combined into the release management workflow to create manual intervention type of scenarios.
- Database Backup – performs a SQL Server database backup remotely.
- Git Tag – adds a tag to a GitHub repository.
- SSIS Deploy – deploys .ispack files to SQL Integration Services.
- .NET Versioner – versions all files in a directory to the specified version number including AssemblyInfo.cs files, SSDT Project files, SSIS Project files, and extended property SQL Scripts.
- URL Status Check – Checks for 200 status code and potential content on a required URL. Great for checking site status after a deploy, and potentially running a health check.
**UPDATE** – ADDED A REPOSITORY HERE THAT I HAVE BEGAN TO ADD SOME OF THE TASKS TOO – https://github.com/travisgosselin/vsts-tasks


I just wish the JSON had some Intellisense to it. Freaking impossible to know what’s valid in any of those spots in a quick & concise manner.
@Brandon -> Yes exactly, that is probably your toughest challenge here is just figuring out what is valid as documentation is so slim right now. Hopefully one day we’ll have better support for the JSON configuration here like we do in ASP.NET Core package.config now (and others in the stack).
[…] Lucky for us, the GitHub API makes this a pretty trivial web request, so all we need to do is wire it up inside a custom VSTS Build Task. If our not sure of the basics of custom build tasks, check out “Building Custom VSTS Tasks“. […]
If you specify a category that doesn’t exist, your task will not appear. You must use a pre-existing task category.